SSP Guide (Getting Started)

Page interface

The page contains the following areas:

image
  1. User profile link and log out button. Click on it when you need to view or change your profile settings or log out.
  2. Sections tabs. Here you can switch between tabs (Dashboard, Inventory, Deals, Report, Billing).
  3. Section page. This area displays all information of the selected section.
  4. You can also find documentation and tips by hovering the mouse over Help button.
    • Management API – learn about platform management API that allows publishers to manipulate their data without logging into the user’s interface.
    • GDPR – here you can get info on how SSP is processing users' consent to ensure GDPR compliance.
    • Publisher Integrations – here you will find guidelines on the variety of integration options you can use for traffic monetization.
    • Macros Integration Troubleshooter – this will help you to check the integration correctness if you encounter errors during the integration process.
    • We are constantly adding more and more articles to explore.
Dashboard

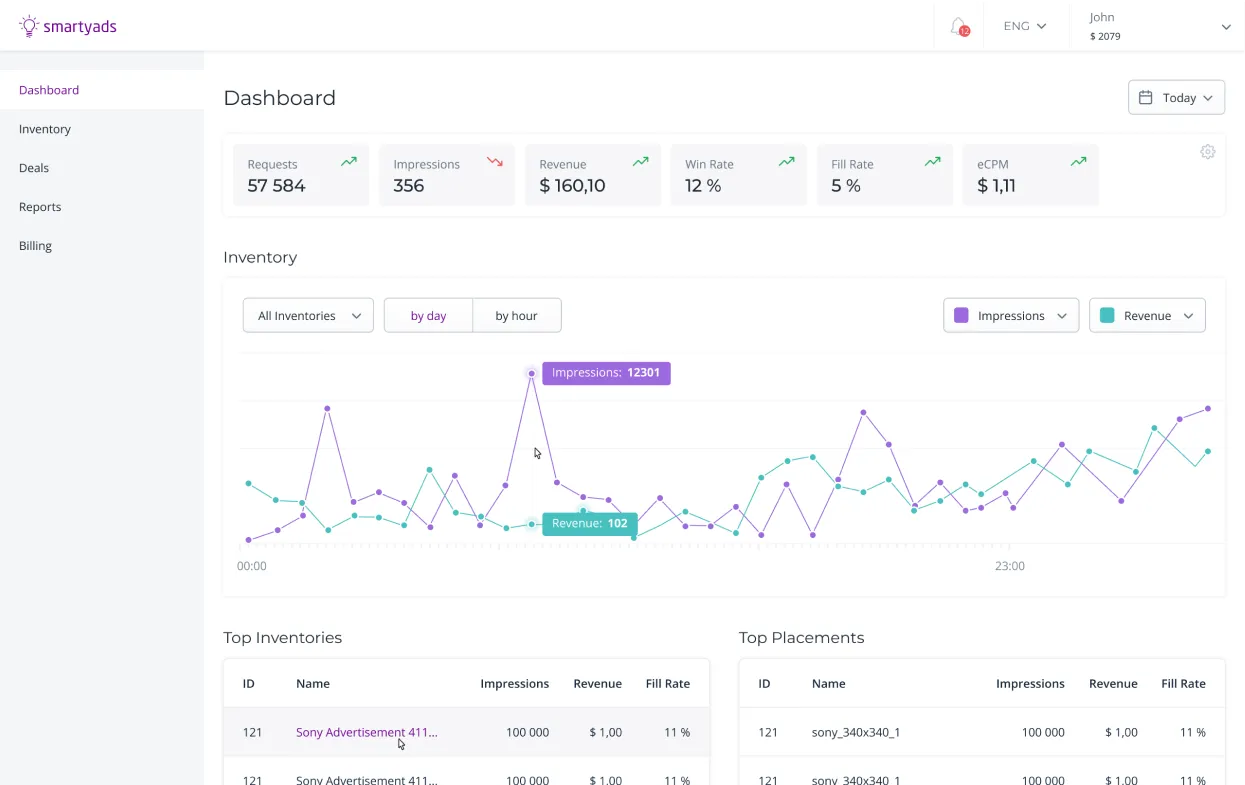
The Dashboard is your main page when you log into the platform. Here you can view the data on your revenue, impressions and fill rate, your current balance, and the charts of TOP-5 performing inventories and placements.

image

You can view statistics for different time periods. To do so, click on dates in the upper right corner and select dates or select Today, Last 7 Days, Last 30 Days, This Month, or Lifetime.

How to add an Inventory


To get started, go to the Inventory page.

image

Click the 'Add Inventory' button to create a new inventory. Then choose inventory type: Android Application, iOS Application, or Web Site.

image

Warning: You won't be able to change the inventory type later, so make sure to choose the correct type. On the opened page, fill in the fields:

image
  • Inventory Name - set the name to recognize this inventory amongst your other inventories. Required field.
  • Language – select the target language of the content. English is set by default. The field is required.
  • GDPR compliant – select it to ensure compliance with the General Data Protection Regulation (a few more steps must be done, use the Help section for more information).
  • Is your inventory child-directed? – Required field. Indicate if your inventory is child-directed per FTC guidelines.
  • Supply Categories — choose one or more categories that represent your content.
  • The left list contains all categories, the right list contains the categories you selected. Single click moves the category from one list to another.
  • Note: Name of each category begins from code such as 'IAB5-1' which is standard IAB (Interactive Advertising Bureau) code for that category.
  • For example, you can choose both categories Automotive and Travel if your content is autotravels.
  • Filter Categories — choose content categories you would like to block.
  • Blocked Domains — you can set top-level domains of organizations whose content you don't want to display in your inventory.

Depending on the type of inventory you can set direct inventory for a single site/app, or the network, or set RON (run-of-network):


Direct website/bundle

For a single direct website (or application bundle for Android app, or iTunes ID for iOS app), set it in the Domain/Bundle/iTunes ID field. The field is required.

 
Network

Network is a pre-defined list of multiple sources.

In case of network, you should paste your ad server/traffic aggregation point domain in Domain field.

Use button to create (or upload) the list of the sources that send traffic to your adserver.

Note: All of these domains/bundles will appear in stats under the inventory created and will be qualified by the system as safe. If there is the source sending traffic through the inventory, but is not registered as associated one when creating inventory, the system will treat it as suspicious.
To create a list, click symbol and download domains or add them manually:
image

To add manually, click [Add Bundles], type domains (separated by commas), and click [Add Bundles to lists]:

image

The domains will appear in the list of associated domains:

image

Inventory with networks will be marked with the sign:

image

After an inventory created, add placements to it.

You can use 1 tag for the group of placements of the same ad format and size. E.g. you have 300 sites in your network scope and there are banner 300*250 placeholder in each. Just create 1 tag for banner 300*250 and use it in all web-sites.
See the Placements section to learn more about using placement tags.

 
RON

Activating the 'Ron Traffic' option enables run-out-of-network requests (the requests in which the domain or bundle doesn’t match domain/bundle specified for the inventory):

image

If turned on, we will accept all requests coming from the placements that belong to this inventory even if the domain/bundle is not the same as the specified for the inventory.

Note: All of these domains/bundles will appear in stats under the inventory created and will be treated by the system as safe. If there is the source sending traffic through the inventory, but it is not registered as associated one when creating inventory, the system will treat it as suspicious.

All of the domains/bundles coming through the inventory will appear in stats under the inventory name and will be treated by the system as safe.
You can use 1 tag for the group of placements of the same adformat and size.
E.g. you have unlimited number of sites in your network scope and there are banner 300*250 placeholders in each. Just create 1 tag for banner 300*250 and use it in all web-sites. See the Placements section to learn more about using placement tags.

After configuring an inventory, click 'Save changes'. Now this inventory will appear on the Inventory page:

image

‘Pending’ below the inventory name (as seen on screenshot) is the status of inventory. The new inventory needs the administrator's approval. It will be activated after administrator checks to confirm it has the correct content and audience. Then you can start making money by selling ad placements.

Note: Inventories for which the networks are specified will be marked with the symbol:
image

After creating an inventory, you have to add some placements to your inventory. To add a banner, video or native placement, use the buttons to the right of the inventory.

You can edit your inventory later, just click the ‘Edit’ button to the right of the inventory name.

You can search for inventories or placements using the search field in the left corner. Type part of the inventory or placement name, and you will be shown only inventories/placements with that text in its name.

Note: the search works only for inventories with ‘Active’ status.

Also, you can hide the declined and test-mode inventory.

You can check earnings for each inventory. To do this, click the "Earnings" button to open a report on the selected inventory.


Placements


After you added an Inventory, you have to add one or more placements.


Adding a Banner Placement

Fill the fields on page (Name and Size or Width/Height is required):

image
  • Placement Name
  • Position — you can specify the position of your placement on the page.
  • Size, Width, and Height — enter width and height of your banner place manually if you have a custom size placement, or select IAB Size if the size is standard. It's recommended to use one of the common sizes for better fill rates.
  • Floor Price (CPM) and Optimal Floor Price—set your minimal floor price for one thousand impressions manually or let us determine the optimal floor price for the placement dynamically.
Note: The placement fill rate may decrease in case the Floor Price (CPM) is too high.

You can set a different floor price for different countries. To do so, click on the planet image in the 'Floor price' field. In the pop-up window, click on Country field and select countries, then set a floor price for them and click 'Done'. Click '+' in the right to add another set of countries. Repeat that steps for each set of countries with a different floor price and click 'Save' after finished.

image

To remove an existing set of countries, click the red cross at that set.

To add the new set of countries, click the ‘+’ symbol.

  • If you activate the optimal floor price, the system sets the floor price automatically, basing on collected statistics about placement. You can leave the Floor Price (CPM) field empty. To set the minimal price for the optimal price floor, you'll need to fill in the Floor Price (CPM) field first and then turn Optimal Floor Price setting to ON.
  • Test mode - When this setting is enabled, a test (non-paid) advertisement will be displayed in the placement and the Fill rate will be 100%
  • Blocked Ad Types — you can choose to block unwanted ad types (for example, iframe and XHTML Text Ad).
  • Blocked Placement Attributes — ads can be blocked by specific attributes selected from the list.
  • Back fill / Passback tag — an optional tag to use in case the placement is not filled by our service.
 
Adding a Video Placement

Fill in the fields:

image
  • Placement Name
  • Position — you can specify the position of your placement on the page.
  • Floor Price (CPM) and Optimal Floor Price— set your minimal floor price for one thousand impressions manually or let us determine the optimal floor price for the placement dynamically.
    Note: placement fill rate may decrease in case the Floor Price (CPM) is too high.

    You can set a different floor price for different countries. To do so, click on the planet image in 'Floor price' field. In the pop-up window, click on Country field and select countries, then set a floor price for them and click 'Done'. Repeat that consequence for each set of countries with a different floor price and click 'Save' after finished.

    To remove an existing set of countries, click the red cross at that set. To add the new set of countries, click the ‘+’ symbol.

    If you activate the optimal floor price, the system set the floor price automatically, basing on collected statistics about placement. You can leave the Floor Price (CPM) field empty. To set the minimum price for the optimal price floor, you'll need to fill in the Floor Price (CPM) field first and then turn the Optimal Floor Price setting to ON.

  • Test mode - When this setting is enabled, a test (non-paid) advertisement will be displayed in the placement and the Fill rate will be 100%
  • Blocked Placement Attributes — ads can be blocked by specific attributes selected from the list.

There are also several specific fields:

  • Video Linearity — In-Stream (inside your video player) or Out-Stream (placed within non-video content).
  • Video Start Delay (for linear video) — the ad can appear before (pre-roll) or during (mid-roll) a piece of video content. For mid-roll, you can specify the exact Start Delay In Seconds in the corresponding field. You can also select generic pre-roll and generic mid-roll.
  • Placing (for non-linear video) — the type of content in which the video will be placed.
  • Playback Methods — choose how to initiate video playback. Depending on this setting, the ad can be played automatically with sound on or off, played on user click or on mouse-over.
  • Allow Skip, Skip Delay — if you set skip to YES, after a specified delay a skip button to end playback will be displayed to a user.
  • Serve ads via API(VPAID) link (for non-linear video) — if you choose this option, you will need to embed generated API link into the player's ad-serving interface and replace its macros with actual values.
  • Supported MIME Types (for linear video and VPAID non-linear video) — choose video format types supported by your player.
 
Adding a Native Placement

Fill in the fields:

image

Fill in the following inputs:

  • Placement Name
  • Width and Height
  • Floor Price (CPM) and Optimal Floor Price— set your minimal floor price for one thousand impressions manually or let us determine the optimal floor price for the placement dynamically.
    Note: placement fill rate may decrease in case the Floor Price (CPM) is too high.

    You can set a different floor price for different countries. To do so, click on the planet image in the 'Floor price' field. In the pop-up window, click on Country field and select countries, then set a floor price for them and click 'Done'. Repeat that consequence for each set of countries with a different floor price and click 'Save' after finished.

    To remove an existing set of countries, click the red cross at that set.

    To add the new set of countries, click the ‘+’ symbol.

    If you activate the optimal floor price, the system set the floor price automatically, basing on collected statistics about placement. You can leave the Floor Price (CPM) field empty. To set the minimum price for the optimal price floor, you'll need to fill in the Floor Price (CPM) field first and then turn the Optimal Floor Price setting to ON.

  • Test mode - When this setting is enabled, a test (non-paid) advertisement will be displayed in the placement and the Fill rate will be 100%

Set Content Info:

  • Ad Environment — select preferred environment: Content-centric context, Social-centric context, or Product context.
  • Advanced Ad Settings — select type of content you prefer for placement.
  • Ad Unit Options — select option (In the feed of content, In the atomic unit of the content, Outside the core content, or Recommendation widget).

Set Ad Elements:

  • Ad Title / Title Length — set length of title or disable this option.
  • Ad Data — set the Data Asset Types available for the placement.

    Available Data Asset Types:

    • Sponsored
    • Desc
    • Rating
    • Likes
    • Downloads
    • Price
    • Saleprice
    • Phone
    • Address
    • Desc2
    • Displayurl
    • Ctatext
  • Ad Image / Image Type — set the type of image that the placement allows.

Click 'Set self ID's for elements' if you want to receive more information about how users interact with elements selected at Data Asset Type.


How to manage placements


After you added placements, you will see it in the list of inventories:

image

Here you can see general information on each placement: its name, icon of type, size (for banner and native) or type (for video placement), status (active or not active), its price settings (the icon to the right of the price shows whether the Floor Price by Country or Optimal Floor Price is activated).

There is also a block of Actions for each placement, which allows you to get tags, edit the placement, and deactivate or activate placement:

image


How to use placement tags

Placement tags are used to connect placements with the SSP platform.

To use a placement tag:

  1. Create a placement. Tags for the placement will be created automatically.
  2. Click the tag symbol in Actions block for that placement.
  3. Copy a tag and paste it to the site code into the body container (<body>...</body>).

For example, copy this code from the 'Direct web page tag' tab and paste it to the web page to run ads in the placement:

image

This is not the only way to monetize the traffic, but there are lots of other types of integrations.

Find out more info at Publisher Integrations in the Help section:

image
 
Private Marketplace Deals

To sell your placements in the private marketplace auction, you can use Deals feature. To get started, open Deals section and fill the new deal fields. If some deals are already created, click "+" button to add a new deal.

Please refer to Deals Guideline for detailed private auction information.

image
  • Set the title of the deal.
  • Set the floor price.
  • Select placements to trade within the deal. By default, all your placements are selected.
  • Set the auction type (first price or second price).
  • Set the estimated number of impressions and/or revenue ($).

The deal will be assigned a unique hash id, which serves to link both sides: publisher and advertiser. Copy that hash code and transfer it to the advertiser. The advertiser must specify the deal ID on their side.

Note: ask your account manager to ensure that the SSP is connected to the advertiser's DSP.

SmartyAds SSP and SmartyAds DSP are already connected to each other, so you don't need such actions if your partner uses SmartyAds DSP.

image

When your estimates are exceeded, the deal will be turned off automatically, and the deal placement will go to open exchange with the second price auction.


Billing


Cashout settings

To receive revenue, you will need to fill in your cashout information. In the navigation bar, click Cashout link in the Billing menu. On the Cashout Settings page, you can set automatic cashout to get your revenue automatically each month.

image

You can choose between PayPal and Wire Transfer cashout options in 'Default cashout method' area.

To set cashout via PayPal, fill in PayPal Email (required field). To set cashout via Wire Transfer, you have to fill in all fields on the page, including routing number (which depends on your region) and account number (International Bank Account Number).

Your revenue will be available for cashout when it reaches $50.00 for PayPal, or $100.00 for Wire Transfer. Money will be withdrawn automatically each month (unless you choose to freeze cashout).

You can see your balance and the date, and amount of money to be withdrawn in your Dashboard.

Transaction history

For the detailed statistics on your earn and cashout, check out the transactions in Billing->Transaction History.

image

You can see the transaction data for each day of the selected period: transaction identifier, daily earn amount, and the transaction type (income or withdrawal).

 
Viewing Report

The Report is a handy way of presenting data with charts and numbers that reflect your inventory performance and revenue. Click Report on the navigation menu.

You'll see the page with parameters with which you have to build a general report:

image

Select Attributes – qualitative indicators by which traffic can be categorized: its country, inventory or placement, etc.

Select Metrics – quantitative indicators of traffic: quantity of requests, wins, impressions, or rates, such as fill-rate, win-rate, or Click-through-rate.

Note: if certain parameter is selected, you can set the filtering on this parameter. To do so, click '>' symbol, then select a type of filter ('less than', 'more than', or 'is 0') and set a value:
image

For example, you can select not only Impressions metric but also only sources that have more than 10000 impressions, or sources with zero revenue, or select only specific countries and ad formats.

Set the period: Today, Last 7 Days, Last 30 Days, This Month or a Lifetime, or set a custom period.

Set the timezone.

Select time aggregation: by days, hours, or months.

After configuring, click 'Generate report' and wait as it builds:

image

You can also save the configuration as a Preset for faster viewing of frequently used configurations. To do so, set the necessary parameters, click 'Add Preset' on the left, set the name for a preset, and click Ok.

In case some presets are already saved, you can easily switch between them, just by clicking the name of a preset.

To change settings of a preset, select a preset, then make changes to its settings, and click 'Update current preset'.

You can download displayed data in CSV format. To do so, click 'Export CSV'.